This page explains how to install the DC/OS Data Science Engine Service.
Prerequisites
- DC/OS and DC/OS CLI installed with a minimum of three agent nodes, with eight GB of memory and 10 GB of disk space.
- Depending on your security mode, DC/OS Data Science Engine requires service authentication for access to DC/OS. See Provisioning a service account for more information.
| Security Mode | Service Account |
|---|---|
| Disabled | Not available |
| Permissive | Optional |
| Strict | Required |
Install DC/OS Data Science Engine
From the DC/OS UI
-
Select the Catalog tab, and search for DC/OS Data Science Engine. Select the data-science-engine package.
-
Click the Review & Run button to display the Edit Configuration page.
-
Configure the package settings using the DC/OS UI or by clicking JSON Editor and modifying the app definition manually. For example, you might customize the package by enabling HDFS support.
-
Click Review & Run.
-
Review the installation notes, then click Run Service to deploy the data-science-engine package.
From the command line
Install the data-science-engine package. This may take a few minutes. This step installs the data-science-engine service.
dcos package install data-science-engine
Expected output:
Installing Marathon app for package [data-science-engine] version [2.8.0-2.4.0]
DC/OS data-science-engine is being installed!

    Documentation: https://docs.d2iq.com/services/data-science-engine/
    Issues: https://docs.d2iq.com/support/
Run a Python Notebook Using Spark
-
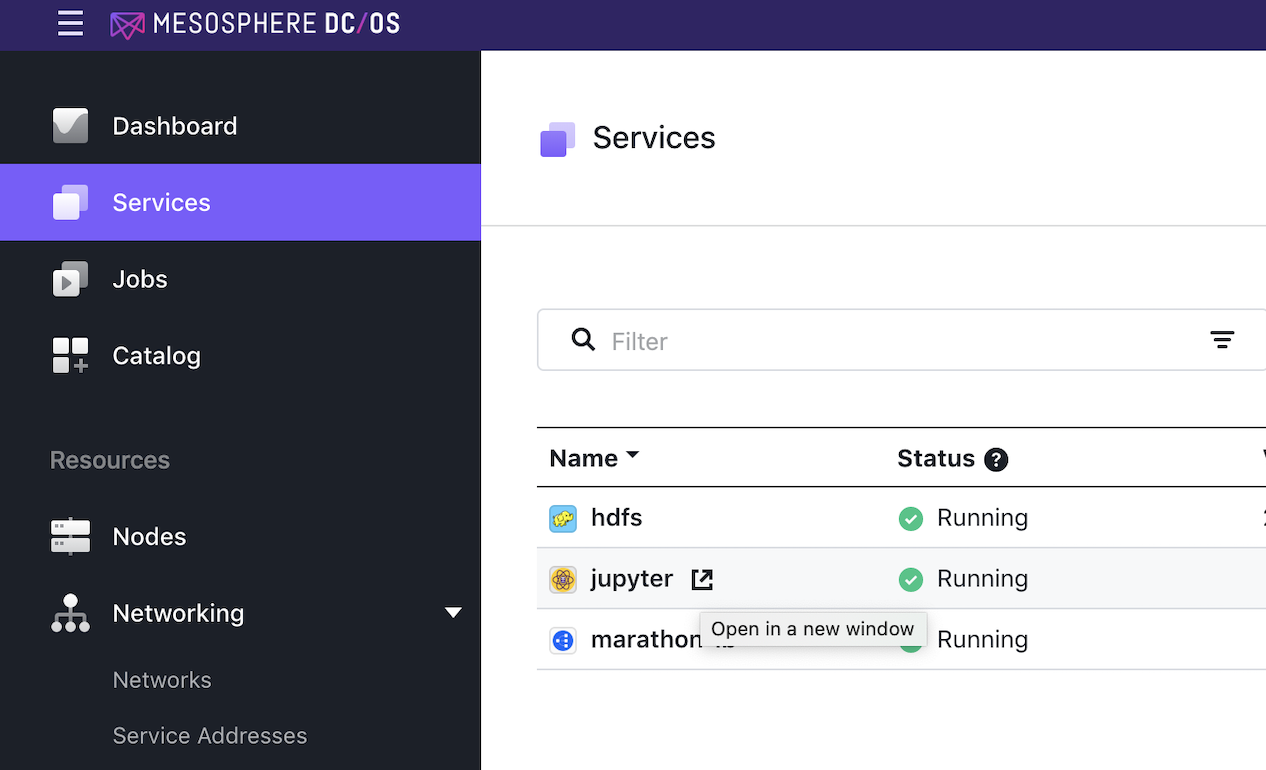
From DC/OS , select Services, then click on the “Open” icon for the data-science-engine.

Figure 1 - Open new Jupyter window
This will open a new window or tab in the browser for JupyterLab. Log in using the password specified during the installation of the data-science-engine package in Service -> Jupyter Password option or use
jupyterby default. -
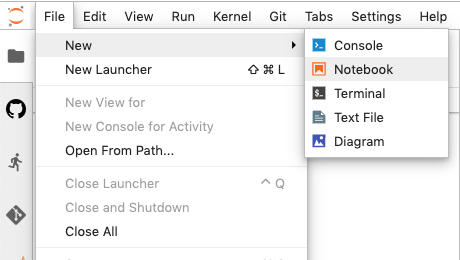
In JupyterLab, create a new notebook by selecting File > New > Notebook:

Figure 2 - Create a new notebook
-
Select Python 3 as the kernel language.
-
Rename the notebook to “Estimate Pi.ipynb” using the menu at File -> Rename Notebook.
-
Paste the following Python code into the notebook. If desired, you can type sections of code into separate cells as shown below.
from pyspark import SparkContext, SparkConf
import random

conf = SparkConf().setAppName("pi-estimation")
sc = SparkContext(conf=conf)

num_samples = 100000000
def inside(p):
  x, y = random.random(), random.random()
  return x*x + y*y < 1
count = sc.parallelize(range(0, num_samples)).filter(inside).count()
pi = 4 * count / num_samples
print(pi)

sc.stop()
-
Run the notebook. From the menu, select Run -> Run All Cells. The notebook will run for some time, then print out the calculated value.
- Expected output: 3.1413234
Enable GPU support
DC/OS Data Science Engine supports GPU acceleration if the cluster nodes have GPUs available and CUDA drivers installed. To enable GPU support for DC/OS Data Science Engine add the following configuration in service config:
"service": {
    "gpu": {
        "enabled": true,
        "gpus": "<desired number of GPUs to allocate for the service>"
    }
}
 Data Science Engine Documentation