A Marathon application typically represents a long-running service that has many instances running on multiple hosts. An application instance is called a task. The application definition describes everything needed to start and maintain the tasks. A Marathon application definition creates a DC/OS service.
Inline shell script
You can deploy a simple program in an inline shell script. Let’s start with a simple example: a service that prints Hello Marathon to stdout and then sleeps for five seconds, in an endless loop.
-
Use the following JSON application definition to describe the application. Create a file with the name of your choice.
{
    "id": "basic-0",
    "cmd": "while [ true ] ; do echo 'Hello Marathon' ; sleep 5 ; done",
    "cpus": 0.1,
    "mem": 10.0,
    "instances": 1
}
In the above example,
cmdis the command that gets executed. Its value is wrapped by the underlying Mesos executor via/bin/sh -c ${cmd}. -
Use the DC/OS CLI to add the service to DC/OS.
dcos marathon app add <your-service-name>.json
When you define and launch a service, Marathon hands over execution to Mesos. Mesos creates a sandbox directory for each task. The sandbox directory is a directory on each agent node that acts as an execution environment and contains relevant log files. The stderr and stdout streams are also written to the sandbox directory.
Declaring resources in applications
To run any non-trivial application, you typically depend on a collection of resources: files or archives of files. To manage resource allocation, Marathon has the concept of URIs (uniform resource identifiers). URIs use the Mesos fetcher to do the legwork in terms of downloading (and potentially) extracting resources.
Example:
{
    "id": "basic-1",
    "cmd": "`chmod u+x cool-script.sh && ./cool-script.sh`",
    "cpus": 0.1,
    "mem": 10.0,
    "instances": 1,
    "fetch": [ { "uri": "https://example.com/app/cool-script.sh" } ]
}
The example above executes the contents of cmd, downloads the resource https://example.com/app/cool-script.sh (via Mesos), and makes it available in the service instance’s Mesos sandbox. You can verify that it has been downloaded by visiting the DC/OS web interface and clicking on an instance of basic-1, then on the Files tab. You should find cool-script.sh there.
As already mentioned, Marathon also knows how to handle application resources that reside in archives. Currently, Marathon (via Mesos and before executing the cmd) first attempts to unpack/extract resources with the following file extensions:
.tgz.tar.gz.tbz2.tar.bz2.txz.tar.xz.zip
The following example shows you how this looks in practice. Assume you have an application executable in a zip file at https://example.com/app.zip. This zip file contains the script cool-script.sh that you want to execute. Here’s how:
{
    "id": "basic-2",
    "cmd": "app/cool-script.sh",
    "cpus": 0.1,
    "mem": 10.0,
    "instances": 1,
    "fetch": [ { "uri": "https://example.com/app.zip" } ]
}
In contrast to the example basic-1, we now have a cmd with the value app/cool-script.sh. When the zip file gets downloaded and extracted, a directory app according to the file name app.zip is created and the content of the zip file is extracted into it.
You can specify more than one resource. For example, you could provide a Git repository and some resources from a CDN as follows:
{
    "fetch": [
        { "uri": "https://git.example.com/repo-app.zip", "https://cdn.example.net/my-file.jpg"},
        { "uri": "https://cdn.example.net/my-other-file.css" }
    ]
}
A typical pattern in the development and deployment cycle is to have your automated build system place the app binary in a location that’s downloadable via a URI. Marathon can download resources from a number of sources. Marathon supports the following URI schemes:
file:http:https:ftp:ftps:hdfs:s3:s3a:s3n:
REST API
You can deploy a simple Docker-based application with the REST API. With Marathon it is straightforward to run applications that use Docker images.
In the following example, you deploy a Docker app to DC/OS using the Marathon API. The Docker app is a Python-based web server that uses the python:3 image. Inside the container, the web server runs on port 80 (the value of containerPort). hostPort is set to 0 so that Marathon assigns a random port on the Mesos agent, which is mapped to port 80 inside the container.
-
Choose whether to use the Universal Container Runtime (UCR) or Docker Engine runtime. See Using Containerizers.
-
To use the Universal Container Runtime (UCR), paste the following JSON into a file named
basic-3-mesos.json:{ "id": "basic-3-mesos", "cmd": "cd /;python3 -m http.server 80", "acceptedResourceRoles": ["slave_public"], "container": { "portMappings": [ { "containerPort": 80, "hostPort": 0 } ], "type": "MESOS", "docker": { "image": "python:3" } }, "cpus": 0.5, "mem": 32, "networks": [ { "mode": "container/bridge" } ] } -
To use the Docker Engine runtime, paste the following JSON into a file named
basic-3-docker.json:{ "id": "basic-3-docker", "cmd": "cd /;python3 -m http.server 80", "acceptedResourceRoles": [ "slave_public" ], "container": { "portMappings": [ { "containerPort": 80, "hostPort": 0 } ], "type": "DOCKER", "docker": { "image": "python:3" }, "parameters": [ { "key": "log-driver", "value": "none" } ] }, "cpus": 0.5, "instances": 1, "mem": 32, "networks": [ { "mode": "container/bridge" } ] }
-
-
Use the Marathon API to deploy the app
basic-3-docker. Refer to Authentication HTTP API Endpoint to learn more about the API token required in the command below.curl -H "Authorization: token=$(dcos config show core.dcos_acs_token)" -X POST <master-IP>/service/marathon/v2/apps -d @basic-3-docker.json -H "Content-type: application/json" -
Go to the Services tab of the DC/OS GUI to view the running service.
-
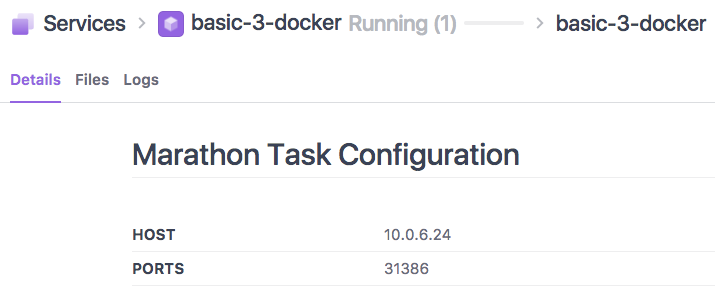
Click
basic-3-dockerand then the task ID. -
Scroll down to the Marathon Task Configuration section and note the PORTS property.

Figure 1. Container port
-
Determine the IP address of the public node.
-
Navigate to
<public-node-IP>:<port>to see the contents of the Docker container’s root directory.
 DC/OS Documentation